728x90

들어가기
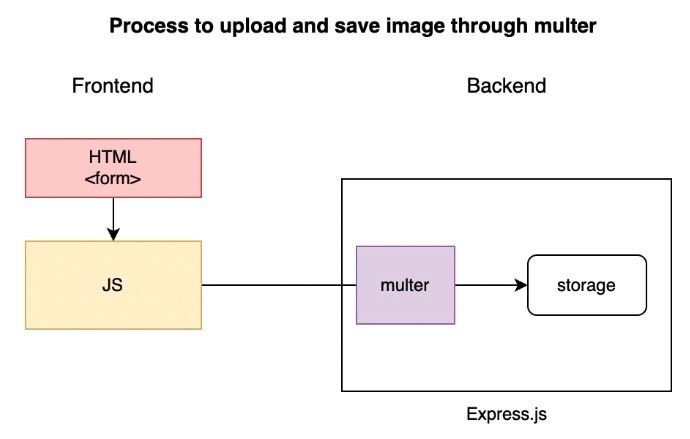
프론트에서 백엔드로 이미지를 전송하는 방법을 알아보겠습니다.
이 게시글에서 정리한 방법은 'html단에서 express.js 서버에 어떻게든 이미지 파일을 보내서 저장시키고 싶다!'라는 사람들(저를 포함)을 위해 기록했습니다.
inpa Dev 블로그(하단 참조 참고)에 따르면, HTML의 <form>에서도 서버로 전송할 수 있고 JS에서 FormData() 클래스로도 보낼 수 있다고 합니다. 따라서 체계적인 방법을 알고싶다면 이 블로그를 참고하시길 권해드립니다.
준비
디렉터리 구조
uploads : 프론트에서 전송한 이미지들이 저장될 디렉터리app.js : express.js 서버index.html : 프론트엔드
패키지
express는 서버를 위해, multer은 프론트에서 보낸 이미지를 서버에서 처리해주기 위한 것입니다.
npm i express multer코드
html
<!DOCTYPE html>
<html>
<head>
  <meta charset="utf-8">
  <meta name="viewport" content="width=device-width">
  <title>JS Bin</title>
</head>
<body>

  <div class="container">
    <h1>File Upload</h1>
    <form id="form">
      <div class="input-group">
        <label for="name">Your name</label>
        <input name="name" id="name" placeholder="Enter your name" />
      </div>
      <div class="input-group">
        <label for="files">Select files</label>
        <input id="files" type="file" name="image" multiple>
      </div>
      <button class="submit-btn" type="submit">Upload</button>
    </form>
  </div>

<script>
  const form = document.getElementById('form');

  form.addEventListener('submit', submitForm);

  function submitForm(e) {
    e.preventDefault(); // 브라우저 default action을 방지하기 위함

    // html <form> 내 기재한 텍스트와 업로드한 파일을 담당하는 엘리먼트를 타게팅하기 위함
    const name = document.getElementById('name');
    const files = document.getElementById('files');

    // formData 객체를 생성
    const formData = new FormData();

    // formData 객체에 텍스트 데이터를 삽입
    formData.append('name', name.value);

    // formData 객체에 복수의 이미지 파일 정보를 삽입. 여러 파일들을 업로드 했기에 반복문으로 처리
    for(let i = 0; i < files.files.length; i++) {
      formData.append('image', files.files[i])
    }

    // fetch api를 사용하여 express 서버에 POST 방식으로 formData 객체 전달
    fetch('http://localhost:5000/upload_files', {
      method: 'POST',
      body: formData,
    //  headers: {'Content-Type' : 'multipart/form-data'}
    }).then((res) => console.log(res)).catch((err) => ('Error occured', err))
  }
</script>
</body>
</html>
app.js
const express = require('express');
const multer = require('multer');

const storage = multer.diskStorage({
  // multer 이미지 저장 위치 설정. 'uploads' 디렉터리에 저장하도록 설정
  destination: function(request, file, cb) {
    cb(null, './uploads')
  },
  // multer 파일명 설정. 현재 시간에 기존 원 파일명을 조합
  filename: function(request, file, cb) {
    cb(null, `${Date.now()}-${file.originalname}`)
  }
})
// 위에서 스토리지 설정을 multer에 적용
const upload = multer({storage: storage})

// express 앱 객체 생성 및 미들웨어 추가
const app = express();
app.use(express.json());
app.use(express.urlencoded({ extended: true}));

// 복수의 이미지들을 저장하기 위한 upload.array() 메소드 사용. 이미지 1개 일 경우 upload.single() 사용
app.post("/upload_files", upload.array('image'), uploadFiles);
function uploadFiles(req, res) {

  console.log(req.body);
    // 텍스트 값이 저장되어있습니다. // 예) { name: '진 카자마' }

    console.log(req.files);
  /*
  [
  {
    fieldname: 'image',
    originalname: '79f45dcf41fcd8a02852c9f2afe185b5.jpg',
    encoding: '7bit',
    mimetype: 'image/jpeg',
    destination: './uploads',
    filename: '1674120581889-79f45dcf41fcd8a02852c9f2afe185b5.jpg',
    path: 'uploads/1674120581889-79f45dcf41fcd8a02852c9f2afe185b5.jpg',
    size: 65763
  }
]
  */

  // 클라이언트에게 전달할 메시지
  res.json({ message: "Successfully uploaded files" });
}

app.listen(5000, () => {
  console.log(`Server is running on 5000`)
})
실행

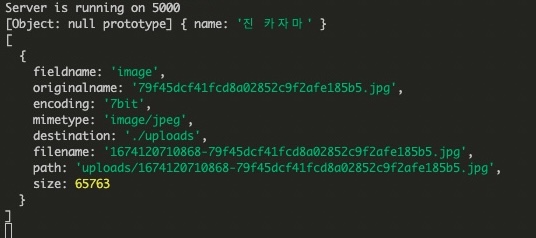
'진 카자마'라는 텍스트를 넣어주고 파일 1개를 업로드 해주겠습니다.
실행 후 터미널 창에는 console.log(req.body)와 console.log(req.files)가 각각 잘 출력되는 것을 볼 수 있습니다.
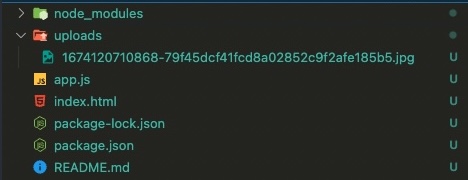
uploads라는 디렉토리에도 현재 파일이 정상적으로 저장되었습니다.
참고자료
- https://inpa.tistory.com/entry/JS-%F0%9F%93%9A-FormData-%EC%A0%95%EB%A6%AC-fetch-api
- https://blog.logrocket.com/multer-nodejs-express-upload-file/
- https://bobbyhadz.com/blog/react-too-many-re-renders-react-limits-the-number
- https://kkumalog.tistory.com/60
- https://ganzicoder.tistory.com/107
- https://juni-official.tistory.com/195
728x90
'Research > HTML' 카테고리의 다른 글
| HTML_basics (0) | 2023.05.02 |
|---|---|
| HTML_introduction (0) | 2023.05.02 |
| shootingstar_HTML_$ is not defined (0) | 2023.04.16 |
| HTML_JS fetchAPI로 서버 데이터 호출 후 HTML에 출력하기 (0) | 2023.04.14 |
| HTML5 boilerplate에 대해 (0) | 2022.10.12 |


댓글