HTML Style - CSS
Now, we are here for CSS. You heard a lot about CSS. What is CSS?
CSS stands for Cascading Style Sheets. It is used to control the layout of multiple web pages all at once. That is why it is called Cascading *.
What is CSS
Cascading Style Shees(CSS) is used to format the layout of a webpage.
With CSS, there are many things you can control, for example, color, font style, font size, the spacing, the way of positioning and do layout elements, background styles, display options depending on devices and etc.
Cascading means that if you apply styles to a parent element, its children elements also will be affected. If you set the color to the body of parant elements, its children elements’ color also be applied.
Using CSS
There are 3 ways to add CSS to HTML documents.
- Inline : using the style attribute inside HTML elements
- Internal : using a <style> element in the <head> section of HTML
- External : using a <link> element to link to an external CSS file
External way is general.
Inline CSS
You can apply a specific style to a single HTML element with an inline CSS. You need to use the style attribute of an HTML element.
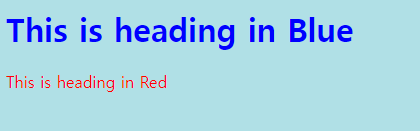
| <h1 style="color:blue">This is heading in Blue</h1> <h2 sytle="color:red"> This is heading in Red</h2> |

Internal CSS
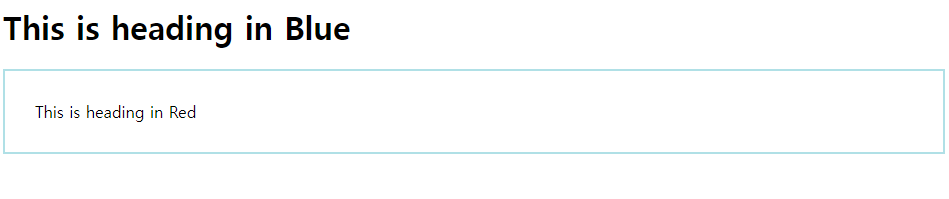
You can use an Internal CSS when there is a single HTML page. An internal CSS is located in the <head> section of an HTML page, specifically in a <style> element.
| <!DOCYTYPE HTML> <html xmlns="http://www.w3.org/1999/xhtml" lang="en" xml:lang="en"> <head> <title>This is my html site</title> <style> body {background-color: powderblue;} h1 {color: blue;} p {color: red;} </style> </head> <body> <h1>This is heading in Blue</h1> <p> This is heading in Red</p> </body> </html> |
See?
External CSS
External CSS is useful when there are multiple HTML pages to apply CSS. It works in a little bit different way. You should add a link in the <head> section of each HTML page.
HTML document
| <!DOCYTYPE HTML> <html xmlns="http://www.w3.org/1999/xhtml" lang="en" xml:lang="en"> <head> <title>This is my html site</title> <link rel="stylesheet" href="styles.css"> </head> <body> <h1>This is heading in Blue</h1> <p> This is heading in Red</p> </body> </html> |
style.css document example
| body { background-color: powderblue; } h1 { color: blue; } p { color: red; } |
CSS Colors, Fonts and Sizes
For text color, you can use the CSS ‘color’ property.
For font, you can use the CSS ‘font-family’ property.
For font size, you can use the CSS ‘font-size’ property.
| <!-- CSS --> h1 { color: blue; font-family: verdana; font-size: 300%; } p { color: red; font-family: courier; font-size: 160%; } |
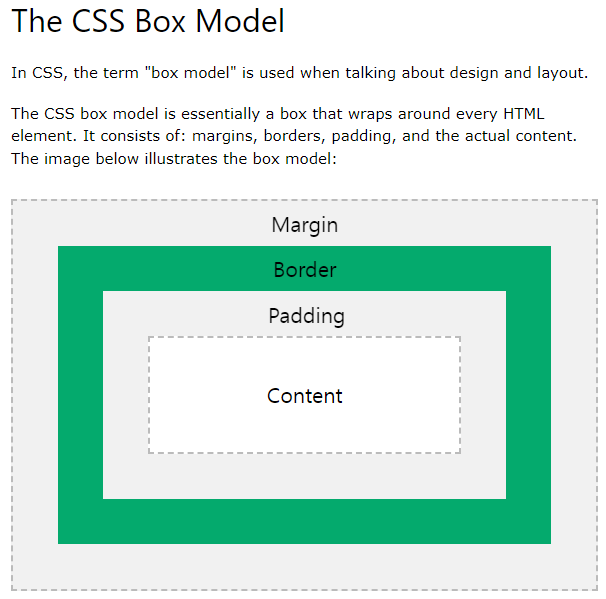
CSS Border
The CSS border property makes a border around an HTML element.
| p { border: 2px solid powderblue; } |

CSS Padding
The CSS padding property adds a padding (space) between the text and the border.
| p { border: 2px solid powderblue; padding: 30px; } |
CSS Margin
The CSS margin property specifies a margin(space) outside the border.
| p { border: 2px solid powderblue; margin: 50px; } |

(ref : w3cshools)
link to External CSS
External style sheets can be referenced with an Absolute or Relative URL path to the current web page.
| <link rel="stylesheet" href="http://www.w3schools.com/html/styles.css"> |
or
| <link rel="stylesheet" href="/html/styles.css"> |
HTML Links
Links are everywhere in the web world.
HTML Links - Hyperlinks
HTML Links are hyperlinks. If you want to know more about hyperlinks, check the history of Internet.
HTML Links - Syntax
The HTML <a> tag defines a hyperlink. It has the following syntax:
| <a href="http://www.businessoffashion.com">link text</a> |

The most important attribute of the <a> element is the href attribute, which indicates the link’s destination. As you see, the ‘link text’ part is visible to the reader.
HTML Links - The target Attribute
If you click the link, the linked page will be displayed by default. To change this, you can define target attributes for the link.
target attribute can have one of the following values:
- _self : default setting. It opens the document in the same window/tab as it was clicked
- _blank : It opens the document in the new window/tab.
- _parent : It opens the document in the parent frame
- _top : It opens the document in the full body of the window
| <a href="http://www.businessoffashion.com" target="_blank">link text</a> |
Absolute URLs vs. Relative URLs
Both examples above are using an absolute URL ( a full web address) in the href attribute. A local link is located within the same website and it is defined with a relative URL(without the “https://www” part).
| <h2>Absolute URLs</h2> <p><a href="https://www.w3.org/">W3C</a></p> <p><a href="https://www.google.com/">Google</a></p> <h2>Relative URLs</h2> <p><a href="html_images.asp">HTML Images</a></p> <p><a href="/css/default.asp">CSS Tutorial</a></p> |
Absolute URL contains an entire path. In contrast, Relative URLs have limited parts of the address.
HTML Links - Use an Image as a Link
You can create an image which is linked to external page by putting the <img> tag inside the <a> tag.
| <a href="https://ko.wikipedia.org/wiki/%ED%94%84%EB%A6%AC%EB%93%9C%EB%A6%AC%ED%9E%88_%EB%8B%88%EC%B2%B4"> <img src="https://upload.wikimedia.org/wikipedia/commons/thumb/1/1b/Nietzsche187a.jpg/236px-Nietzsche187a.jpg" alt="HTML tutorial" style="width:200px;height:200px;"> </a> |

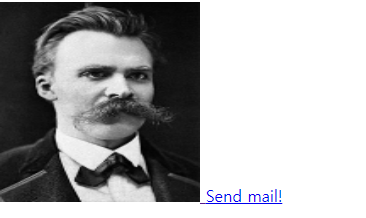
Link to an Email Address
You can put mailto: inside the href attribute so that it creates a link that open the user’s default email software.
| <a href="mailto:hello@gmail.com">Send mail!</a> |
Button as a Link
It is a clickable HTML button. You can play it with JavaScript code. JavaScript allows you. JavaScript allows you to specify what happens at certain events, such as a click of a button.
| <button onclick="document.location='default.asp'">HTML Tutorial</button> |
Link Titles
The title attribute specifies extra information about an element. The information is most often shown as a tooltip text when the mouse moves over the element.
| <a href="https://www.w3schools.com/html/" title="Go to W3Schools HTML section">Visit our HTML Tutorials</a> |

If you hover your mouse on the link, the title will be displayed.
HTML Links - Different Colors
An HTML link can be showed in a different color depending on whether it has been visited, is unvisited, or is active.
HTML Link Colors
By default, An unvisited link is underlined with blue, a visited link is underlined with purple, and active link is underlined with red.
But you can change this setup with CSS:
| <!DOCTYPE html> <html> <head> <style> a:link { color: green; background-color: transparent; text-decoration: none; } a:visited { color: pink; background-color: transparent; text-decoration: none; } a:hover { color: red; background-color: transparent; text-decoration: underline; } a:active { color: yellow; background-color: transparent; text-decoration: underline; } </style> </head> <body> <h2>Link Colors</h2> <p>You can change the default colors of links</p> <a href="html_images.asp" target="_blank">HTML Images</a> </body> </html> |
Link Button
Let’s create a button that turns pale red to bright red if you hover your mouse on it.
| <!DOCTYPE html> <html> <head> <style> a:link, a:visited { background-color : #f44336; color: white; padding: 15px 25px; text-align: center; text-decoration: none; display: inline-block; } a:hover, a:active { background-color: red; } </style> </head> <body> <h2>Link Button</h2> <p>A link styled as a button:</p> <a href="default.asp" target="_blank">This is a link, bro</a> </body> </html> |
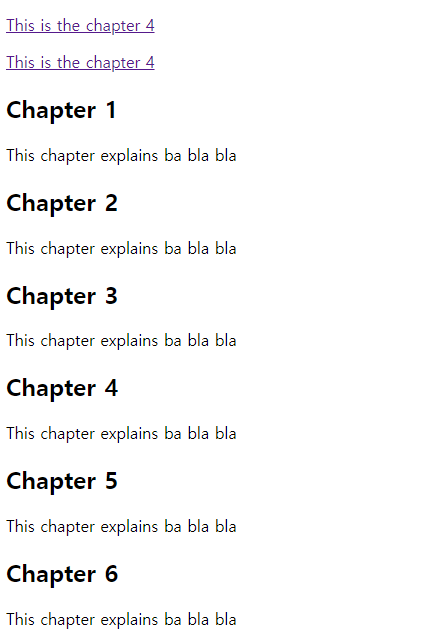
HTML Links - Create Bookmarks
You can use HTML links to make bookmarks, so that readers can go directly to the area of a web page.
Create a Bookmark in HTML
Bookmarks can be useful when a web page is long.
| <body> <p><a href="#C4">This is the chapter 4</a></p> <p><a href="#C10">This is the chapter 4</a></p> <h2>Chapter 1</h2> <p>This chapter explains ba bla bla</p> <h2>Chapter 2</h2> <p>This chapter explains ba bla bla</p> <h2>Chapter 3</h2> <p>This chapter explains ba bla bla</p> <h2 id="C4">Chapter 4</h2> <p>This chapter explains ba bla bla</p> ... <h2>Chapter 23</h2> <p>This chapter explains ba bla bla</p> </body> |
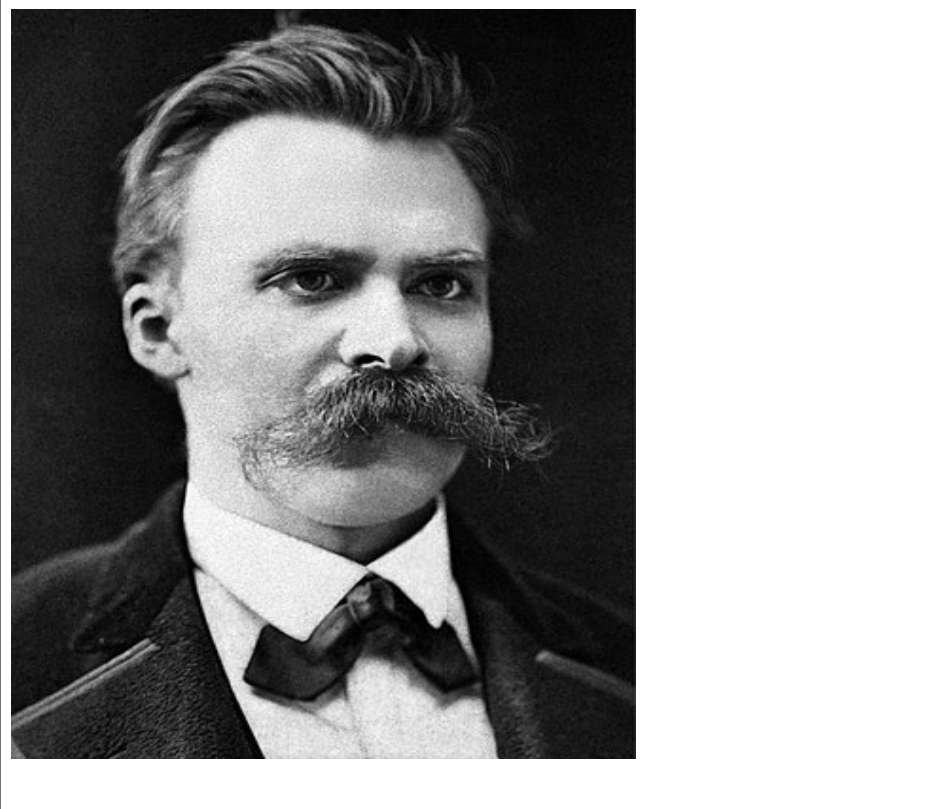
HTML Images
Image is the key of the design and the appearance of a web page.
| <html> <head> <title> This is study note no.2 </title> </head> <body> <img src="https://upload.wikimedia.org/wikipedia/commons/thumb/1/1b/Nietzsche187a.jpg/330px-Nietzsche187a.jpg" alt="Nietzsche"> </body> </html> |
HTML Images Syntax
The HTML <img> tag is used to embed an image in a web page.
Images are not technically inserted to a web page; images are linked to web pages. The <tag> tag creates a holding space for the referenced image.
The <img> tag is empty, it contains attributes only, does not have a closing tag.
The <img> tag has two required attributes:
- src : specifies the path to the image
- alt : specifies an alternative text for the image
formula
| <img src="url" alt="alternateText"> |
The src Attribute
The required <src> tag specifies the path(URL) to the image.
Note: When a web page loads, it is the browser, at that moment, that gets image from a web server and inserts it into a web page. Therefore, make sure that the image actually stays in the same spot in relation to the web page, otherwise your visitors will get a broken link icon. The broken image icon and alt text are shown if the browser cannot find the image.
The alt Attribute
The required alt attribute provides an alternative text for an image, if the user for some reason cannot view it (because of slow connection, an error in the src attributes, or if the user uses a screen reader).
The value of the alt attribute should describe the image:
| <img src="url" alt="alternateText"> <img src="img_chania.jpg" alt="Flowers in Chania"> <img src="https://upload.wikimedia.org/wikipedia/commons/thumb/1/1b/Nietzsche187a.jpg/330px-Nietzsche187a.jpg" alt="Nietzsche"> |
The browser cannot find the two images.
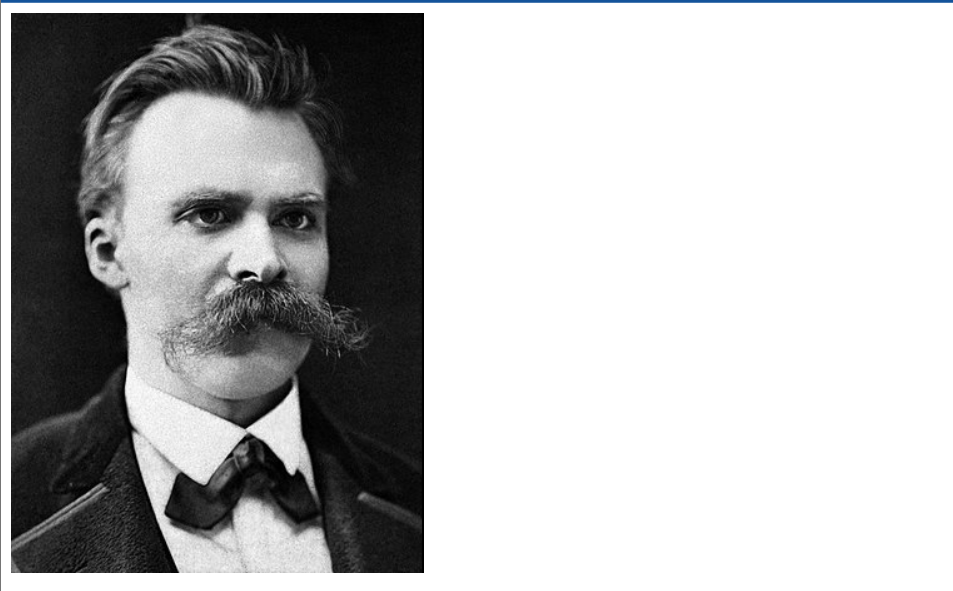
Image Size - Width and Height
You can use the Style attributes to specify the width and the height of an image. Also you can use ‘width’ and ‘height’ attributes to specify those.
| <img src="https://upload.wikimedia.org/wikipedia/commons/thumb/1/1b/Nietzsche187a.jpg/330px-Nietzsche187a.jpg" alt="Nietzsche" width="500", height="600"> |
The proportion of the picture of Nietzsche is changed.
Width, Height, or Styles?
The width, height, and Styles are all valid in HTML. However, we suggest using the styles attribute. It prevents style sheets from changing the size of images.
| <img src="https://upload.wikimedia.org/wikipedia/commons/thumb/1/1b/Nietzsche187a.jpg/330px-Nietzsche187a.jpg" alt="Nietzsche" styles="width:500px;height:300px;"> |
Images in Another Foler
If you have your images in another folder, you should include the folder path name in the src attribute:
| <img src="/images/philosophers/Nietzsche187a.jpg/330px-Nietzsche187a.jpg" alt="Nietzsche" styles="width:500px;height:300px;"> |
Images on another server/website
Some web sites point to an image on another server.
To point to an image on another server, you must specify an absolute (full) URL in the src attribute:
| <img src="https://upload.wikimedia.org/wikipedia/commons/thumb/1/1b/Nietzsche187a.jpg/330px-Nietzsche187a.jpg" alt="Nietzsche" styles="width:500px;height:300px;"> |
Notes on external images: External images might be under copyright. If you do not have permission to use it, you may be in violation of copyright laws. In addition, you cannot control external images; It can suddenly be removed or changed.
Animated Images
HTML allows animated GIFs:
| <img src="https://media4.giphy.com/media/i6hhAddlCU2C4/giphy.gif?cid=ecf05e472f242cfa42905a42e728d05d7c3871e5dbf88316&rid=giphy.gif&ct=g" alt="Not Nietzsche" styles="width:500px;height:300px;"> |

Image as a Link
To use an image as a link, put the <img> tag inside the <a> tag.
| <a href="default.asp"> <img src="https://media4.giphy.com/media/i6hhAddlCU2C4/giphy.gif?cid=ecf05e472f242cfa42905a42e728d05d7c3871e5dbf88316&rid=giphy.gif&ct=g" alt="Not Nietzsche" styles="width:500px;height:300px;"> </a> |
Now, an image became clickable with link.
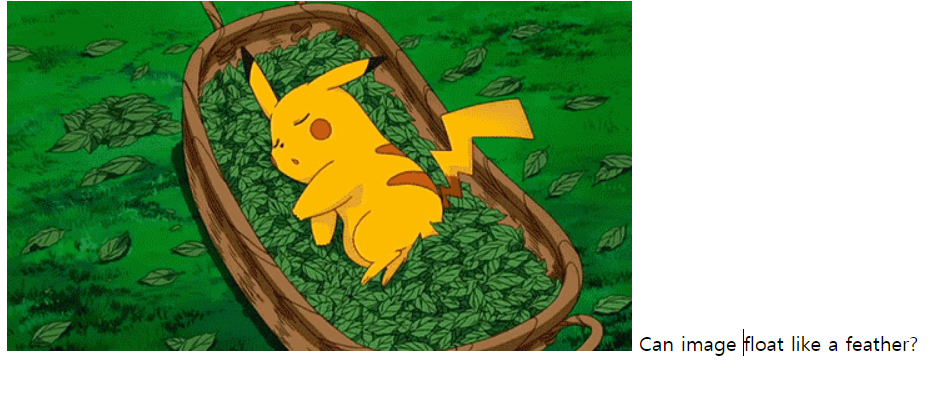
Image Floating
Use the CSS float property to let the image float to the right or to the left of a text:
| <p> <img src="https://media4.giphy.com/media/i6hhAddlCU2C4/giphy.gif?cid=ecf05e472f242cfa42905a42e728d05d7c3871e5dbf88316&rid=giphy.gif&ct=g" alt="Not Nietzsche" styles="float:left;width:500px;height:300px;"> Can image float like a feather?</p> |
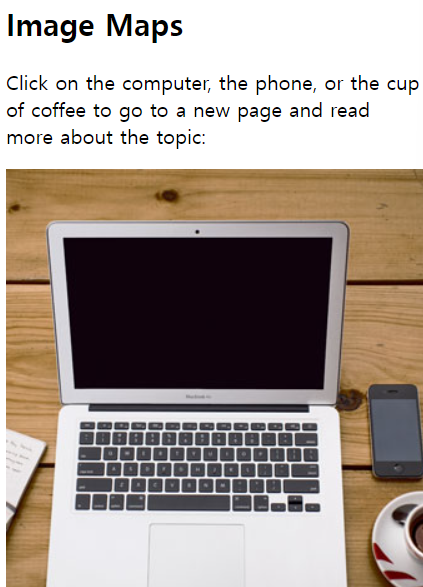
HTML Image Maps
with HTML image maps, you can create clickable areas on an image.
Image Maps
The HTML <map> tag defines an image map. An image map is an image with clickable areas. The areas are defined with one or more <area> tags.
| <!DOCTYPE html> <html> <body> <h2>Image Maps</h2> <p>Click on the computer, the phone, or the cup of coffee to go to a new page and read more about the topic:</p> <img src="workplace.jpg" alt="Workplace" usemap="#workmap" width="400" height="379"> <map name="workmap"> <area shape="rect" coords="34,44,270,350" alt="Computer" href="computer.htm"> <area shape="rect" coords="290,172,333,250" alt="Phone" href="phone.htm"> <area shape="circle" coords="337,300,44" alt="Cup of coffee" href="coffee.htm"> </map> </body> </html> |
How does it work?
The idea behind an image map is that you should be able to perform different actions depending on where in the image you click.
To create an image map you need an image, and some HTML code that describes the clickable areas.
The Image
The image is inserted using the <img> tag. The only difference from other images is that you must add a usemap attribute.
| <img src="workplace.jpg" alt="workplace" usemap="#workmap"> |
The usemap value starts with a hash tag # followed by the name of the image map, and is used to create a relationship between the image and the image map.
Create Image Map
Then, add a <map> element. The <map> element is used to create an image map, and is linked to the image by using the required name attribute
| <map name="workmap"> |
The name value must have the same value as the <img>’s usemap attribute.
The Areas
Then, add the clickable areas. A clickable area can be defined using an <area> element.
Shape
You must define the shape of the clickable area, and you can choose one of these area styles:
- rect : rectangular region
- circle : circular region
- poly : polygonal region
- default : entire region
For example,
| <area shape="rect" coords="34, 44, 270, 350" href="computer.htm"> |
In coords attribute, the value “34, 44, 270, 350” means shape position from (34,44) to (270,350).
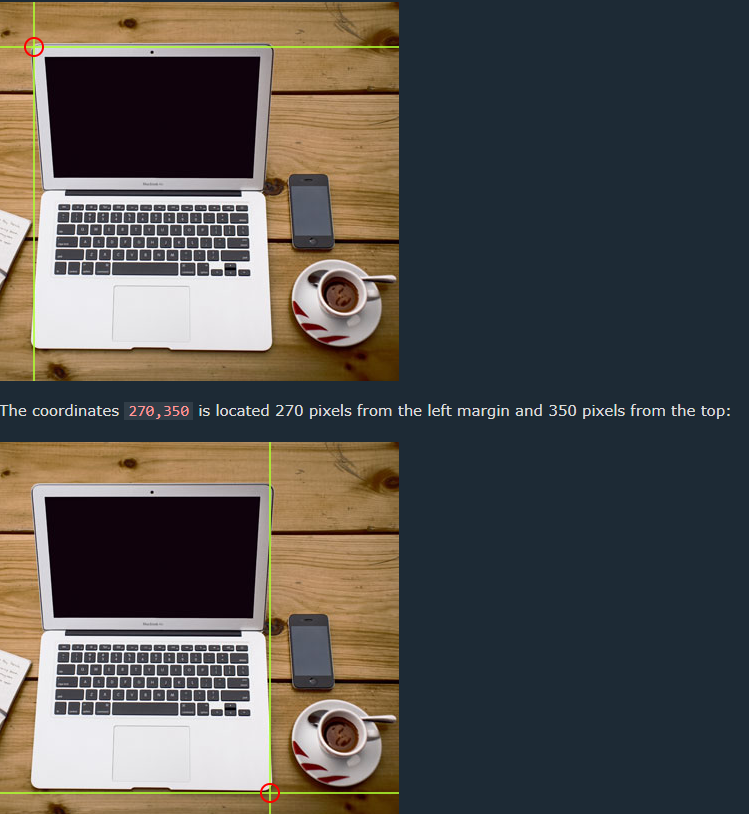
In case of circular region, you can do like this.
| <area shape="circle" coords="337, 300, 44" href="coffee.htm"> |

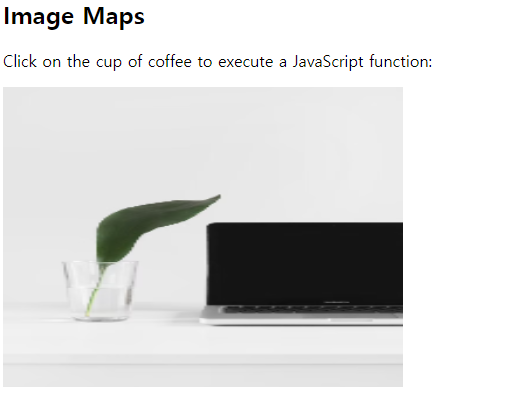
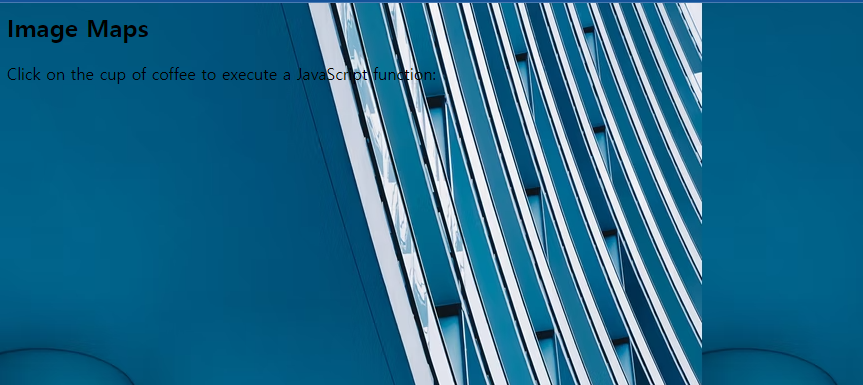
Clickable area with JavaScript
We got the image from Unsplash and its img tag has usemap attribute with the value “plantmap”. And map tag’s attribute name has its value ‘plantmap’ and if you click this region, the url is opened.
| <html> <head> <title> This is study note no.2 </title> </head> <body> <h2>Image Maps</h2> <p>Click on the cup of coffee to execute a JavaScript function:</p> <img src="https://images.unsplash.com/photo-1471897488648-5eae4ac6686b?ixlib=rb-1.2.1&ixid=MnwxMjA3fDF8MHxwaG90by1wYWdlfHx8fGVufDB8fHx8&auto=format&fit=crop&w=687&q=80" alt="plant" usemap="#plantmap" width="400" height="300"> <map name = "plantmap"> <area shape="circle" coords="100,100,50" href="naver.com" onclick="myFunction()"> </map> <script> function myFunction() { alert("You clicked the coffee cup!"); } </script> </body> </html> |
HTML Background Images
A background images can be specified by almost any HTML element.
Background Image on a HTML element
To add a background image on an HTML element, use the HTML style attribute and the CSS background-image property.
| <body> <h2>Image Maps</h2> <p style="background-image:url('https://images.unsplash.com/photo-1649436937510-2644430dc1e1?ixlib=rb-1.2.1&ixid=MnwxMjA3fDB8MHxwaG90by1wYWdlfHx8fGVufDB8fHx8&auto=format&fit=crop&w=703&q=80');">Click on the cup of coffee to execute a JavaScript function:</p> </body> |

You can also specify the background image in the <style> element, in the <head> section:
| <html> <head> <title> This is study note no.2 </title> <style> p {background-image : url('https://images.unsplash.com/photo-1649436937510-2644430dc1e1?ixlib=rb-1.2.1&ixid=MnwxMjA3fDB8MHxwaG90by1wYWdlfHx8fGVufDB8fHx8&auto=format&fit=crop&w=703&q=80'); } </style> </head> <body> <h2>Image Maps</h2> <p>Click on the cup of coffee to execute a JavaScript function:</p> </body> </html> |
Background Image on a Page
What if we want to specify a background image on the entire page? The answer is the <body> element:
| <html> <head> <title> This is study note no.2 </title> <style> body {background-image : url('https://images.unsplash.com/photo-1649436937510-2644430dc1e1?ixlib=rb-1.2.1&ixid=MnwxMjA3fDB8MHxwaG90by1wYWdlfHx8fGVufDB8fHx8&auto=format&fit=crop&w=703&q=80'); } </style> </head> <body> <h2>Image Maps</h2> <p>Click on the cup of coffee to execute a JavaScript function:</p> </body> </html> |
wow.
Beautiful.
Background Repeat
If the background image is smaller than the element, the image will repeat itself, both horizontally and vertically, until it reaches the end of the element:
You don’t want the background repeated? Then you can set the background-repeat property to no-repeat.
| <style> body { background-image: url('example_img_girl.jpg'); background-repeat: no-repeat; } </style> |
Background Cover
If you want the background image to cover the entire element, you can set the background-size property to cover.
Also, to make sure the entire element is always covered, set the background-attachment property to fixed:
This way, the background image will cover the entire element, with no stretching (the image will keep its original proportions):
| <style> body { background-image: url('img_girl.jpg'); background-repeat: no-repeat; background-attachment: fixed; background-size: cover; } </style> |
Background Stretch
If you want the background image to stretch to fit the entire element, you can set the background-size property to 100% 20%:
| <style> body { background-image: url('img_girl.jpg'); background-repeat: no-repeat; background-attachment: fixed; background-size: 100% 100%; } </style> |
Haha, Paul is stretched.
The HTML <picture> Element
The HTML <picture> element gives web developers more flexibility in specifying image resources. It is like a container.
The <picture> element contains two or more <source> element, each referring to different images through the srcset attribute. This way the browser can choose the image that best fits the current view and/or device.
Each <source> element has a media attribute that defines when the image is the most suitable.
| <picture> <source media="(min-width: 650px)" srcset="img_food.jpg"> <source media="(min-width: 465px)" srcset="img_car.jpg"> <img src="img_girl.jpg"> </picture> |
When to use the Picture Element
There are two main purposes for the <picture> element:
1.Bandwidth
If you have a small screen or device, it is not necessary to load a large image file. The browser will use <source> element with matching attribute values, and ignore any of the following elements.
2.Format Support
Some browsers or devices may not support all image formats. By using the <picture> element, you can add images of all formats, and the browser will use the first format it recognizes, and ignore any of the following elements.
| <picture> <source srcset="img_avatar.png"> <source srcset="img_girl.jpg"> <img src="img_beatles.gif" alt="Beatles" style="width:auto"> </picture> |
HTML Favicon
A favicon is a small image displayed next to the page title in the browser tab.
You can create your own favicon image here.

To add a favicon to your website, either save your favicon image to the root directory of your webserver, or create a folder in the root directory called images, and save your favicon image in this folder. A common name for a favicon image is “favicon.ico”.
| <!DOCTYPE html> <html> <head> <title>My Page Title</title> <link rel="icon" type="image/x-icon" href="favicon.ico"> </head> <body> <h1>This is a Heading</h1> <p>This is a paragraph.</p> </body> </html> |

It’s a free drawing favicon.
'Research > HTML' 카테고리의 다른 글
| HTML_lists (0) | 2023.05.02 |
|---|---|
| HTML_tables (0) | 2023.05.02 |
| HTML_colors (0) | 2023.05.02 |
| HTML_quotes, citations, comments (0) | 2023.05.02 |
| HTML_styles (0) | 2023.05.02 |


댓글